Getting Started
How does it work
To run Neuronvisio you can either use the provided neuronvisio executable, which will create an ipython session:
$ neuronvisio
Note
On windows, you can launch it with neuronvisio.bat
or you can start ipython and load neuronvisio from within your script, as explained in section How to integrate Neuronvisio with your code
To load Neuronvisio just paste this two lines in ipython:
from neuronvisio.controls import Controls
controls = Controls()   # starting the GUI
The Control class run the main loop of the application with all the GUI activities in its own thread. The console is ready for input so you can enter your command to the prompt as you would do normally when using NEURON.
Loading a file
You can also load 3 different formats right now:
- A NeuroML file (.xml)
- A NEURON hoc file hoc file (.hoc)
- A HDF file formatted according to Neuronvisio format, (.h5). Check storage.
to load any of them just pass it as an argument:
$ neuronvisio path/to/my/file.hoc (or .h5, or .xml)
How to integrate Neuronvisio with your code
The integration is rather simple and you can use either the python or the hoc scripts that you already have.
Python integration
If you have a model written in python, just import the module on top of your script. The simple example (in the example directory) give you an idea how to do it.
A classical template is:
from neuronvisio.controls import Controls
from neuron import h
controls = Controls()   # starting the GUI
# Your model here
Hoc Intergration
You have to load your hoc script using the python interface of _NEURON. The pyramidal example gives an idea how to integrate existent _NEURON model with it.
A classical template is:
from neuronvisio.controls import Controls
from neuron import h
controls = Controls()   # starting the GUI
h.load_file('path/to/my_model.hoc')
Neuronvisio features
Visualization
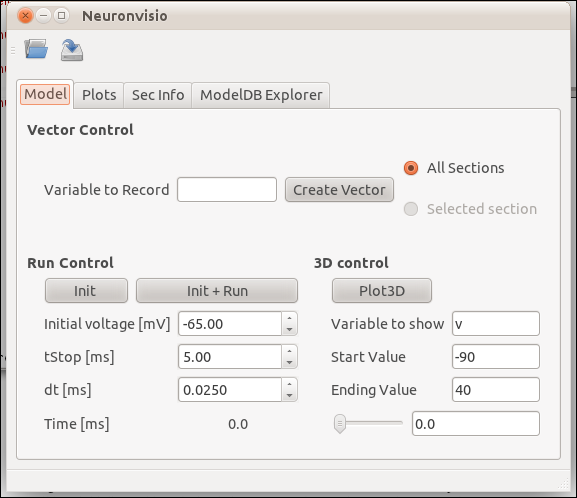
To visualize you model after you loaded you have to click the Plot3d button.
The 3D window will open showing your model:
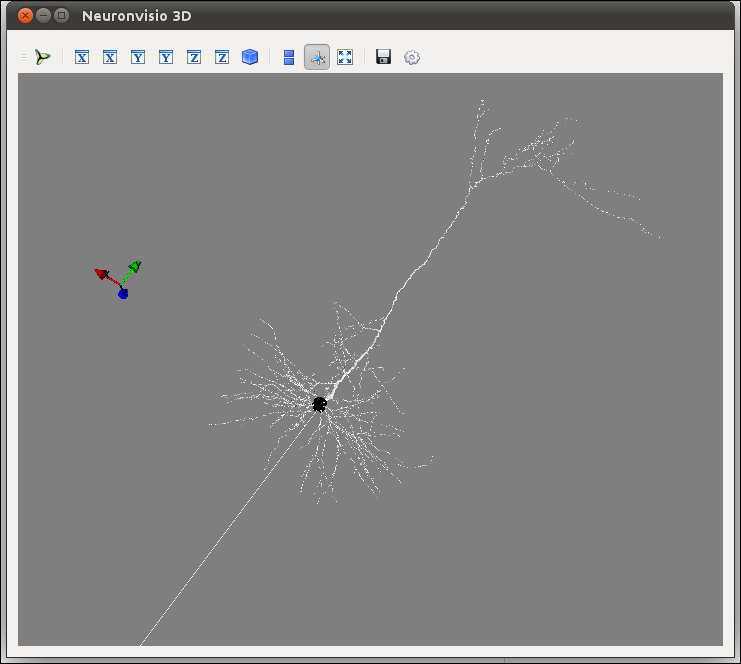
How to rotate
Hold the left button and move the mouse.
How to zoom
Use your mouse’s wheel or the right button of the mouse.
How to move
Hold the wheel down and move the mouse.
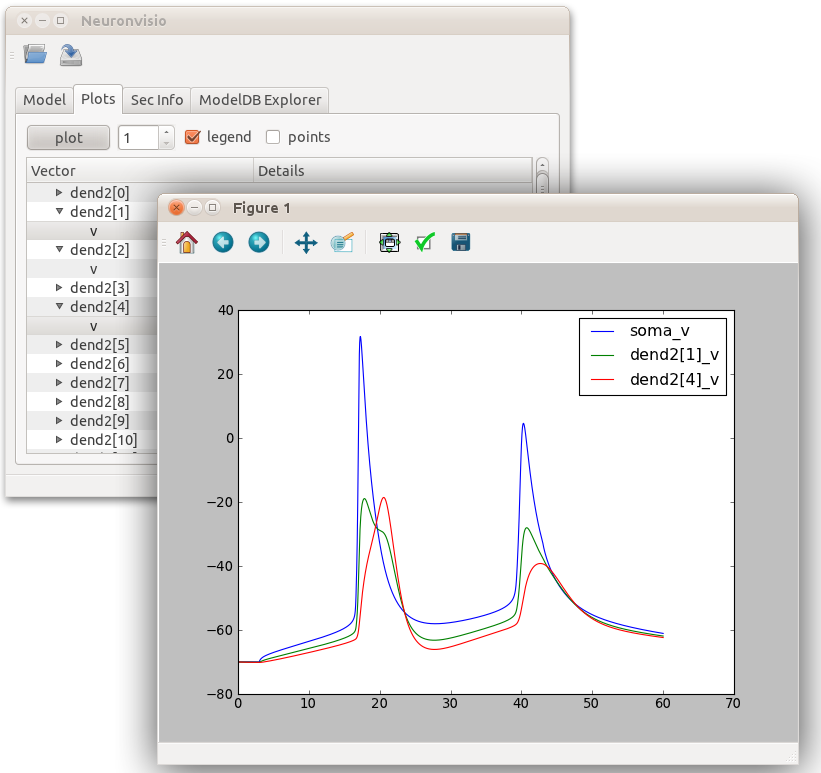
Plotting the simulation results
Creating the vectors
To plot the simulation’s results you first have to create a Vector (or more than one) to record the variable that you are interested in.
For example if you are interested in the voltage you have to insert v in the ‘Variable to record` and click Create Vector.
Run the simulation
The simulation can be run clicking on the Init & Run button. It will run until the tstop.
Plotting the simulation
To plot the results click on the tab ‘Plots’ and select the variable from the section you want to plot. Then click Plot.
If you want to plot more variables in one go hold Ctrl and select as many as you want, then click Plot
If you want to insert the legend just select the legend box
Investigate the section parameters
Select a section (Just click over it) and the section info will be displayed in the Sec Info Tab.

ModelDB Integration
This section describe how to load a model from ModelDb in Neuronvisio, and how to get the latest model from the ModelDB, if they are not already present in the ModelDB XML list.
Browsing the NEURON models from ModelDB
ModelDB database is a lightly curated repository of computational models, published in litterature http://senselab.med.yale.edu/ModelDB/. While ModelDB accepts models in a variety of format, a large subset is formed by models stored in NEURON format. The ModelDB NEURON’s model are stored in an XML file, which comes with Neuronvisio source code. The file is parsed at run time and the content is loaded in a Qt tree widget, available in the ModelDB explorer tab.
It is possible to browse among all the available models per year of publication, authors, title and unique id number. The columns can be ordered alphabetically, and it is possible to perform a simple search, writing the desired keyword in the search box.
If available, the README associated with the model is displayed, together with a custom model overview which summarizes the features of the model, enumerating the type of channels used, the cell types, the brain region, etc.
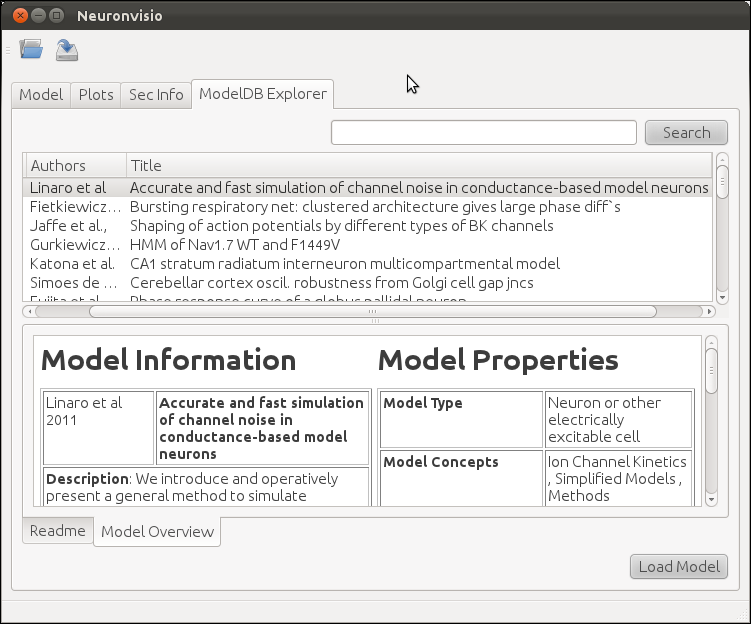
Loading a NEURON model from ModelDB
Any of the models available on the ModelDB explorer tab can downloaded and extracted. The models which have a mosinit.hoc will also be compiled and loaded in the current session, giving the user the possibility to explore and simulate the model.
If no mosinit.hoc is found, the software will open the folder where the model has been downloaded, warning the user of the impossibility to load it automatically.
Note
if the model does not have a mosinit.hoc, Neuronvisio cannot load it, because does not know what to load as master file. You can always load the relevant file following the section Hoc Intergration or Python integration.
Updating information from ModelDB
The content of the XML file which is included with each version of Neuronvisio is usually up-to-date with the content of ModelDB at the time of the release. Updating this file from the online DB can be done by manually, if required, by running from any shell the script neuronvisio-modeldb-updater. Neuronvisio updater will find where the current ModelDB.xml is stored, and update with the latest items, if any.
Note
You need to be able to write on the ModelDB.xml location. If you have installed the package as root, you may need to run it as root.
It should be noted that the model extraction from ModelDB is slowed down to 1/sec in order to avoid loading the site. Also this process only update the file with models which do not exist in the local XML file and does not currently refresh the content of existing ones.
Troubleshooting
If you start ipython with the –pylab=qt switch and get and error like:
    /usr/local/lib/python2.7/dist-packages/pyface/qt/__init__.py in prepare_pyqt4()
     15     # Set PySide compatible APIs.

     16     import sip
---> 17     sip.setapi('QString', 2)
     18     sip.setapi('QVariant', 2)
     19

    ValueError: API 'QString' has already been set to version 1
It means ipython has loaded the PyQt4 using the Version 1 of the API, which is default on Python 2.7 (Version 2 is default on Python 3.)
To solve this you can either define the variable QT_API=pyqt, e.g. in bash:
$ export QT_API=pyqt
$ ipython --pylab=qt
Or you can launch ipython without pylab support, load Neuronvisio and then load pylab with the magic %pylab.
Picking the right backend
If when you try to plot matplotlib segfault, you may have the wrong backend selected. Neuronvisio try to set the right backed, but if you start ipython with –pylab, automatically a bakcend is loaded and we can’t change it due to matplotlib technical limitation.
To solve this, just customize your matplotlibrc downloading the matplotlibrc, saving the file in .matplotlib/matplotlibrc and changing the backend to Qt4Agg, from:
backend : GTKAgg
to:
backend : Qt4Agg